The 2nd floor’s floor is finished! I wish I could say the entire 2nd floor is finished, but we still need to re-install the baseboards and put a coat of white paint on everything that is currently white. Except the wall outlets. Those are white enough 🙂

We mentioned our crazy-sounding plan to put paper bag flooring down in this post. The method I used came from an excellent tutorial post at LovelyCraftyHome. One difference in my case was my concrete sub floor. I tried a few of the suggestions on LCH’s tutorial. Elmer’s glue worked perfectly for me, but Stain/Polyurethane alone did not; it would not adhere to the concrete.
Another special consideration for concrete sub floor is preparation. We had nail holes every few inches along the border of the room from the carpet tack strip. We patched those and a few low areas with Vinyl concrete patch. (It didn’t want to work very well, but we forced it to.) The paper did not adhere to patches as well as to concrete, but it was sufficient. Then we scraped the floor to remove the ridges in carpet adhesive, old drywall mud, etc. Even after being scraped level, the carpet adhesive on the concrete slab affected the color (slightly) of the paper covering it. Luckily it does not deter from the overall floor.
We used 15 ounces of Elmer’s glue for every 2.3 cups of water. You could thin the glue/water ratio down more. I do recommend using a food scale instead of a measuring cup. You just put the bowl you’re using on the scale, tare it to zero, and pour the glue straight into the container it will be used in.
Per LCH’s tutorial, I ripped the paper into pieces (I aimed for 5×7 inch rectangles), wadded them up into balls, and separated the straight edges to use along walls.
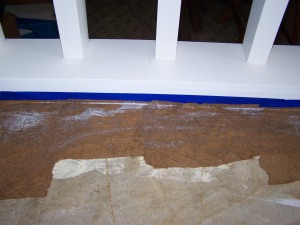
We started around the border of the room with the straight-edge pieces. Immediately after we placed the pieces, they wrinkled up. I optimistically ignored it, and luckily for me, almost everything flattened out after drying.

Some other concerns for me during this step were that you would be able to tell that I worked left-to-right around the border (can’t tell at all), that the hazy glue mess on top of everything would still be visible after drying (nope), and that my left knee would never be the same (it made it!).

See how hideous and wrinkly that mess is? It worked out pretty well in the end. I would estimate this step took 40 hours. Luckily, there were 5 of us, so we got it done in one day.
Once the glue dried (overnight), it looked like this: (Sorry for the poor picture, I only have pictures of the huge gaps at this step)

I was happy with the floor at that point, but I 100% wanted it darker. We patched the larger gaps, let the glue dry, and then spent about an hour staining the floor (2 people). We used Stain/Poly mix and ripped-up t-shirt rags. I felt exactly like Cinderella. The rags worked great. I’m still not sure about the Stain/Poly.

Everywhere that we overlapped layers of stain, there is a visible transition. In other areas, the stain looks smeared on; you can see the pattern in the floor where the rag was pushed.

My theory for the smeared areas is simply an over-soaked rag in those places; it was some of the last areas done and I was getting sloppy. As far as the overlaps; learn from my lesson. Do not overlap the stain at all. My instinct is that the stain/poly blend is less forgiving than stain when it comes to overlaps.
There were also little gaps all over the floor. The brown sharpie was too red, and the black sharpie was way off… So, I filled them in with a brown sharpie, and then put a few lines of black sharpie over the brown, and then smeared it in with my finger.

Anywhere there was a wrinkle on the edge of the paper, stain seeped under and turned it significantly darker. Note to the next person; if you don’t want sporadic darker patches, smash those wrinkles after the glue dries the first time, and glue them down again.

We tried some gel paint stripper and a toothbrush in a few of those areas to lighten up the floor.

The floor dried for 5 days after this step, mainly because we didn’t want to polyurethane the floor after work 🙂 We used a 6″ cabinet/foam roller on a broom stick to apply the floor polyurethane (Worked like a charm). We just followed the directions on the polyurethane.

The floor dried in the sunlight much quicker during the glue step, and we wanted to avoid that during the poly. We just so happened to have some contractor paper lying around :), so we covered the sliding door while the poly dried.

The instructions specified 4+ hours to dry between coats, but it was 9 hours before the floor lost it’s tackiness for each coat we did. We got 4 coats out of the gallon of poly with some leftover for patches as needed. The polyurethane step took about 3 hours spread over 2 days.
It’s been 3 days since then, and we’re still not really walking on it. It still smells though 🙂
For the transition between the floor and the railing wood trim, I taped off the wood, and glued the paper right up to the wood itself. Once the poly dried, I took a razor knife and cut the paper along the joint.

For a 280 sq foot room, I used
- (most of) a 450 sq foot roll of Contractor paper ($10.98)
- 1.25 gallons of Elmer’s All purpose glue ($12.33 ea.)
- (most of) 1 qt Mini-wax Polyshades in “Mission Oak Gloss” ($11.85)
- 1 gallon of oil-based floor poly ($37.50)
We got everything from Lowe’s.
I also used the help of 3 family members (priceless) and 1 spouse (conscripted service).
That’s about $80; $.29 a square foot installed. Less than vinyl tile 🙂
So far, it’s a floor. You could call it faux cork floor. It’s warmer and less gritty than bare concrete. You can feel the texture of the floor through socks. I’ll post back with how it handles our 50 pound puppy. (Update; after four months, our hyperactive 50 pound dog hasn’t been able to scratch the finish on this floor. It still looks brand new.)
I think after finishing this first area, if we do it again (like those carpeted stairs, perhaps? I hate the carpet stairs) we’ll be better at it. We’ll know to crush any ridges after the glue dries, and to be very cautious with the stain.
The 2nd floor is still pending the baseboards, and another coat of white paint on all the trim. The we can finally put stuff back in here. It’s starting to look like the mood board I was aiming for months ago 🙂


Update on Floors:
After 6 years of regular use, I was still happy with how the floors held up. The worst damage came from a roommate (my younger brother) dropping a treadmill on the floor. It gouged through the paper, so I used a brown sharpie to make the concrete match. (Similar to how small gaps were patched when we laid the floor.)
Small bubbles formed in the Polyurethane in some areas after about 4 years. They were not noticeable, but I could have sanded those areas slightly and applied another layer of poly. We sold the house before I got around to that 🙂 I can tell you that it held up to foot and dog claw traffic very well!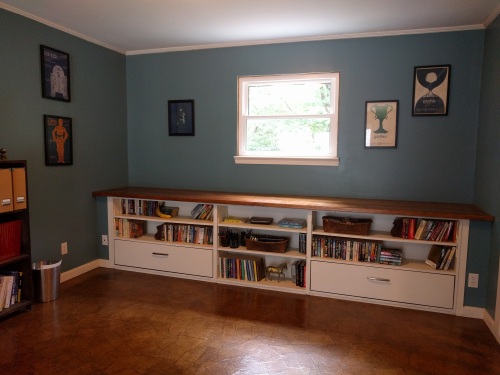


Wow, how long did that take?
It wasn’t too bad, especially considering how big the room is. 5 of us spent most of a Saturday putting the paper itself down, and it was stained the next day. The polyurethane was all put on the following Friday night and Saturday. If we really killed ourselves, my husband and I could have done it alone in two weekends.
Cool!
LOOKS GREAT!!!!!!!!!!!!!
Very nice explanation and pics. It turned out nice!
[…] ceiling texture, switched the ceiling lights, painted, built a railing, covered the concrete in paper-bag flooring, re-installed the crown molding, changed the electrical boxes, and painted some […]
Wow, how wonderful this turned out! I am opening a boutique next month and plan to use this technique for the floor. Thanks for all of the tips on things to avoid. I have concrete floors and really appreciate that I wont waste time or money with the poly application verses the glue. I want my pieces to be larger, do you think that this cuts down on paper the application time at all?
I noticed none of the “Flaws” you mentioned. It just looks superb to me ! I’m going to try this over concrete in my daughter’s bedroom. (We turned our garage into a bedroom for her) Do you think this would work to redo a laminate countertop ?
I think the countertop will work fine! If it’s really slick, I may sand it first to give the glue something to stick to. Good luck!
I just tried this for the first time and love it. What did you mean by the next time you would know to crush any ridges after the glue dries? I have some wrinkles and it is all dry so what should I do before the poly goes down?? Thanks..Lori
If the wrinkles have left gaps under the paper, stain will seep in under them and make that area much darker. If you’re going to stain it before the poly, I would just crush the wrinkles and re-glue that area so the stain doesn’t soak in too much.
Was wondering, I am about to do this as well and I’m going a dark coffee color, my question is does the stain soak thru the glue ok? I may glue mine down and just finish the edges on the top so that the stain will soak thru the bag. Let me know if u had this issue! Thx!
I stained it on the top surface only, after the glue had dried. It worked just fine for me 🙂 Good luck!
Thank you for posting this! I’ve seen several “how to’s” for it, but I like the detail in yours. I think I have decided to do this in my living room and dining room. Our house is over 100 years old and the floors are far from level or square. I think this would work perfectly. I was wondering if, instead of crushing the wrinkles before staining, if you could cut the paper along the ridge, overlap the pieces and re-glue or would that leave too straight an edge? Thanks for your input and I think your floor looks great!
I think cutting the wrinkles would work fine, unless they were gigantic; a straight line 2 or 3 inches long will not be noticeable. Good luck, and wear knee pads 🙂
Love your floor.Would love to do this in my kitchen.Would it work over plywood?
My inspiration post here: http://lovelycraftyhome.com/2011/11/09/the-ultimate-brown-paper-flooring-guide/ does hers on top of plywood! She changed the glue ratio a little, but it turned out awesome. Good Luck!
I used this technique in my entryway months ago over old ugly tile to give it a new look. I didn’t want to try to take the tile up..I love the way it came out.. I used Elmers glue mixed a little more than half glue to a little less water than half.. used a paint brush to brush glue on one side of the paper (after it was crumbled up) and then to brush a coat over the top.. used bigger pieces leaving gaps that I filled in with smaller pieces.. looks more like stone. I used a dark walnut stain that I put down with a lambs wool applicator and worked backwards so I wouldn’t have to walk over it and then used a paintbrush taped to an extension pole to put polyethylene down the next day (put on old cotton socks if you have to walk on stain and be sure to let it sit at least overnight. I wound up pouring a puddle of poly down and just brushing it out evenly, and repeating until floor was covered.. then added a couple layers after each dried.. I had no problems with paper not sticking and the few imperfections in stain just add to the beauty!! I plan on doing the parts of my floor that have carpet next.. LOVE IT!!
Could you share a picture of this done over tile? Someone else asked about putting it over tile, but I was worried about how it would look over the bumpy grout lines.
I would love to see how this worked over tile!
Thinking of doing this procedure over my tile. I can not find one person other than you that has done it. So you still lime it? Should i be concerned about trying to fill in grout lines? Any info you could give me would be appreciated. Other than what you have shared here of course. Thanks so much. Bethann
I did this in my kitchen and basement, by myself it’s a job but well worth it. I cut my paper out to look like stones it turned out great. I even put this in my kitchen behind the stove and sink I mixed sand and paint together it looked like mortar.
Did you just do this around your appliances or did you move them out? My house is over 100 years old and the kitchen had carpet in it, YUCK, I have to either put new subfloor down or find something to take the glue off of the old subfloor.
Do you think this would work over tile? I would like to use white paper and do my bathroom.
Any texture in the subfloor is going to show right through the paper, so I don’t think it’ll work out very well. Sorry I’d be hesitant to do it in a bathroom also, because water won’t go through this floor, but it will seep in through the edges and make it bubble up.
Love the floor ! Nice job! I must ask how long has the floor been down now? And how is it holding up ? What is your opinion on several layers of bag ? How do you feel about instead of poly( worried it chips) ( mine is high traffic area) maybe a thick epox rubbery top clear coat ? Thanks for the help
The floor has been done for right at a year now. It’s holding up perfect; even with our 55 lb crazy dog. I would not layer up the bags: One layer makes a texture that you can feel with your hand or through socks, multiple layers would probably make dirt settle in the creases and feel super textured. Our polyurethane is holding up great, and it isn’t affected by the sun. I worry that epoxy would react to sunlight. When we’ve used epoxy before (garage floor) it’s more difficult to apply evenly. It would definately be durable enough, though 🙂
I wonder if this works on ceramic tile .
I did this on concrete with elmers and water (50/50). it adhered very well and once it dried I stained it. Now I’m on my 4th coat of floor poly, it looks beautiful, but the ripples that I thought would go away, stayed. Can I still do something about them? Or will they get better as I poly more coats? I’m afraid of snagging them.
Ooohh, the ripples may be too set to fix after the poly. I cut all the ridges and smashed them down before the poly. At this point, I would try to get an exacto blade and cut the ridge, and then smash both sides down. Good luck!
I panicked when I did my bathroom with this technique and I had ridges after the glue dried. But reading about your process was very helpful. I just crushed the ridges and re-glued. It looks great 🙂
Thanks!
Oil-based poly? Why? Most of the instructions I’ve seen call for water-based, my understanding is that oil-based might yellow. (I’ve done this too with very positive results. Instead of stain, I used an overlay of different colored paper to create a “stone” effect.)
I actually don’t remember very well 🙂 I think the oil-based poly was less expensive. It did yellow the stain color when I applied it, but I liked the warmer tone that it added to the stain. I think either kind would work well.
This is awesome! I’m going to do this in my basement over concrete. I’m also thinking of covering a wallpapered wall. I love it!
I did it over wallpapered wall 15 years ago and I still love it!
I love your floors. I see you did this over cement. Was your cement floor rough or smooth? Mine is very smooth and I’m worried about the glue adhering to the surface. Also, How big is your room that took 40 hours? And How much overlap should I allow so I don’t have gaps to touch up after it dries? Thanks so much for posting this.
Our concrete was very smooth, and it’s worked great. This room is 280 square feet, so fairly large. As far as overlap, the paper does not shrink at all when the glue dries, so as long as the paper overlaps when you place it, it will stay. Most of my gaps were less than 1/4″. Good luck!
Would white freezer paper work – I have tons of it.
I doubt it, actually. The brown paper is really porous: it soaks up glue, stain, and polyurethane like a charm. Freezer paper is very waxy, so it wouldn’t let anything soak in. The brown craft paper is super cheap, and it works great.
I know its been a while since you’ve done this, but just wanted to say awesome job! I will be doing it to our den which is 280 sqft too. I just may have to recruit help if it took 5 people 40 hours, ouch! Love your detailed instructions, thank you for sharing. I truly appreciate the update of how it’s holding up after a year.
It wasn’t tooo much work, the 5 of us got it knocked out in a day, I just guessed that it would take one person 40 hours by themselves. Good luck!
I am thinking about doing this in my kitchen and down the hallway by the laundry area. (I have a single wide trailer) I am worried about moving the heavy appliances back into the kitchen once finished. Do you have any advice that might help?
I would be very generous with the polyurethane. Maybe a few extra coats? The floor will hold up well to scratches, but there is a texture to it, so you may catch on a small wrinkle and rip it up. Good luck 🙂
Well I did this process over 5 years ago and have loved it. The problem I have now
is how to patch it. I patched it a few years ago no problem. Now when I try to patch it the new piece doesn’t look the same. It looks patched. Any suggestions?
I haven’t needed to patch mine yet (2.5 years in!). The stain was very touchy for me though; if I overlapped it or soaked it more the color changed. As long as you’re using the same stain and poly, that’s the only thing I could think of that would make them look different. Besides being super careful with matching stain, do you think another layer of poly on the entire floor would help even it out?
Well I have been putting poly coats on the patches daily to get the 12 coats, then I was going to do the whole floor with a fresh coat. The patches just don’t have the crinkled effect. They are flat looking. Doing the same process as before. A friend said maybe it was the paper. I have the same paper that I used 5 years ago and it has been in the garage with a lot of temperature changes. Going to try that next. In meantime, I stumped. And same poly too.
We did two bedrooms and a bathroom several years ago and the floor is holding up great!!! I had a few scratches in one bedroom. My youngest is pretty hard on her floor but all patched up just fine. Just a note about the crinkling that I learned. If you have ever wallpapered a wall you will have learned about “booking” the paper. That is soaking the paper in glue & water and letting it sit for at least 5 min to soak up the moisture. The paper also swells as it does that. I booked the pieces of paper that I put down and we had no crinkling at all. I just soaked 8 – 10 balls of paper and put them aside in a small bucket for at least 5 min before I placed them on the floor. It may take a little longer if you are doing it alone but if you have a helper, it can go rather quickly. Anyway, love your pics. Great job!
Floors look Great!! I live in South Louisiana where we just flooded and I’m just wondering how this type of floor would hold up to flood waters. We had 3 1/2 foot of water in the house for 3 days. Any input would be great.
Thank you! They are holding up pretty well… except for where some rain water got tracked in from the patio door. I would definitely not vouch for these with flooding; the paper swells up and un-glues itself from the floor.
I used water based Polly and if it gets wet it can dry and be ok. But if left wet for to long it can pull away from the floor but the nice thing about this is it’s easy and cheap enough to repair.
I did this over ceramic tiles with water based Polly let it dry and stained it with oil based stain and did 10 coats of Polly it turned out AMAZING! Everyone that sees it is amazed by it, & of course they can not believe it is brown paper😊
I’m wondering how your floors look now…and how much damage your puppy might have caused by now. Thanks!!